Friday, April 29, 2016

A few other places for plates...

Earlier this week I shared some plate wall inspiration that I've come across over the years on other blogs and Pinterest. Hopefully you were able to grab an idea or two for starting a wall of your own.

Just in case you can't envision all those holes at the moment, I thought I'd give you a few other ideas for hanging decorative plates but on a slightly smaller scale.

You know that space between your cabinets and your counter tops? It's the perfect place to add a grouping of plates.

My friend Kristi's kitchen


Combine a few plates with a mirror to make a stunning entrance.

My mom's pretty entrance


If you have an odd space between a piece of furniture and a door, hang your plates vertically.

My friend Gay's dining room
Use the space above your windows to draw the eyes up and make your ceilings seem a bit taller.

Kristi's again :-)

(And what a cute idea for a curtain tie.)


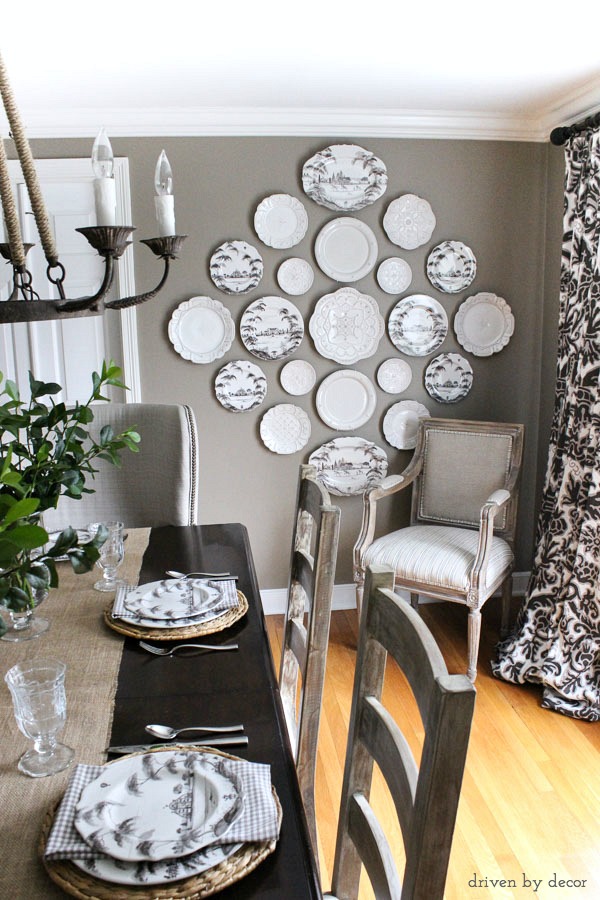
And what about plates without color? Those will work too. Use them on a contrasting wall.

Our dining room

Feel free to mix solids and prints as well.


OK, find the plates you aren't using at the moment or head out to your favorite thrift store. Hunt for plates with colors and patterns you like. Arrange them on the floor in different ways until you find one that speaks to you. Hang your center plate or platter first, and work your way out.

Happy Friday!
Kathryn

Tuesday, April 26, 2016

Using plates to decorate...

One of the easiest ways to complete a space is a decorative plate wall. Plates add a fantastic focal point to a room. To me they add character, charm, and they give any space a sense of uniqueness.

I bet you have a few random plates that could get the ball rolling for you or maybe you have an entire set of dishes that has been retired for a while. I say pull them out, and hang them up!

Let me show you some inspiration.

This first picture is one of my favorites. Gorgeous, isn't it?

Image: Driven by Decor

I love the red and white transfer ware and the dramatic statement this presentation makes.

Image: Apartment Therapy 

Here's a fun, colorful idea.

Image: Life in Grace Blog

They even work well in a small space.

Image: The Shabby Nest
I love this neutral inspiration using texture and nature. Makes for a beautiful spot.

Image: Jenny Collier Blog
If you love the look of a plate wall, but you're not sure where to start, head to your local thrift store. Old and not-so-old plates are usually readily available in tons of sizes and rarely cost more than a few dollars. Then, when you get home, mix them up with what you have to create your unique wall. 

Later this week I'll show you some other ways to display plates to enhance a space or high light a collection, and I'll share a few spots in our home where we've used plates.  

Are you displaying plates anywhere in your home?

Kathryn

Friday, April 22, 2016

My Fried Okra

OK. So, my husband looked at me like I'm off my rocker for a post about frying okra. Maybe he's right. Maybe you were all born knowing how to fry okra. I, however, was not. It took me a few tries to get it right. Now the plate of fried okra is empty way before we all want it to be. I know it seems like a summer food, but thanks to Publix, you can eat it all year round, and we do.

This is the brand I buy. It's 2 lbs., frozen, and in a resealable bag--easy to use just what you need.


Pour the amount of thawed or fresh okra you want to cook onto a plate and gather your ingredients.


Ingredients:

1 lb thawed frozen or fresh cut okra
Salt and pepper
1 tablespoon of flour (All-purpose or self-rising)
1/2 - 1 cup corn meal mix
1 gallon plastic storage bag
Crisco

After the okra thaws, salt and pepper it on the plate and put it in a gallon bag. 


Sprinkle the okra with the flour and add enough corn meal mix to sufficiently coat it. (Probably about 1/2 cup of corn meal mix to 1/2 lb of okra.) Seal the bag and shake it, flip and flop it, turn it upside down, whatever you have to do to coat the okra well. Add more corn meal if necessary.


While you're shaking your bag, melt the Crisco over low heat. Most cooks would probably say you need an iron skillet, but I just use a regular Teflon one--the same one I use for everything. The Crisco should be about 3/4 inch deep, just enough to almost cover the top of the okra.


It takes 20-30 minutes for the okra to brown cooking on medium-high heat. I usually cover it for the first 10 minutes or so, and cook it uncovered for the remaining time. Stir when the edges start to brown.


Cook until it's the crunchie texture your family likes. Then, drain on paper towels and watch how fast it disappears.


I wish I had a bite right now! Have a good weekend...

Kathryn

Tuesday, April 19, 2016

Living room corner refresh...

Last week I mentioned I was getting ready to freshen up a corner in my living room. Part of the plan was to use the prints called 12 Months of Flowers that belonged to my grandparents. I started and finished the corner refresh in a rather timely manner--surprisingly.

Step 1: Spray paint the frames.

The inside of the frames was black, and the outer part of the frames was speckled with black spots. The spray paint greatly improved their look and covered up some of the blemishes. The paint I used is here.


Fancy drying stand

Here is the living room corner before. . .


And here it is after. . .


The space feels much lighter, and I love having something of my grandparents on my walls. I topped them off with a tiny sunburst mirror I spotted at Ross.


I swapped out the blanket and cream pillow for these. It's probably hard to tell in the picture, but the blue pattern of the pillow blends perfectly with the blue in the prints.


The baskets underneath the bench are a thrift store score I told you about months ago.


They're holding throw blankets and storing books at the moment.


12 Months of Flowers
Thanks for stopping by today. Do you have a special, sentimental something you're using in your home? You can always share on the comment link below.

Hope your week is off to a great start!!
Kathryn

Friday, April 15, 2016

A few ideas for the moms out there...

Hard to believe it's almost time for Mom's special day again. I've chosen three things she might like in case you're ready to get shopping... 

I'm one of those girls who usually carries a fairly large bag, but this year I ditched the big one for a cross body. I LOVE THE CHANGE! It frees up my hands for carrying other things, and it's also easier when I'm trying to find something in the bag. They may look small, but I have a wallet, glasses' case, check book, pens, and a little make-up in mine--with room to spare. 


My second idea I've mentioned to you before. You can read more about Luca+Danni here. Their jewelry selections are so pretty and reasonably priced. You'll enjoy perusing through their inventory--something for every mom. 


My third idea would also make a good wedding gift. I have The Nesting Place and have really enjoyed it. The other ones are on my wish list. Lots of style diversity in the books. Your mom's style or your style is in there somewhere. Fresh ideas are always fun. 


Modern Mix
BHG New Decorating Book
Domino The Book of Decorating
The Nesting Place
Elements of Style


Now you have a few ideas to get you started. 
Happy Friday!!

Kathryn

Tuesday, April 12, 2016

New life for old flower of the month prints...

Do these look familiar to you? Do you recall seeing them at your grandparents' house?


They are from a collection of prints called Twelve Months of Flowers originally painted by Robert Furber circa 1700. He was a British author and horticulturist. (Wikipedia)

Years ago my grandparents were doing some cleaning and these were in the to-go pile. I snagged them, and for probably ten years they've been taking up space in a closet. I tried to get rid of them multiple times, but I just didn't want to say goodbye--perhaps I really did like them enough to one day use them or maybe it was because they belonged to my grandparents, Momma Bea and Granddaddy.

I decided to get them out and add them to a corner of my living room that needed some new life. Not too many posts back, I mentioned I had two new cans of spray paint. One can was for this project.

The frames have a few small age spots on them (don't we all :-) ), and the inside of the frames is black. The spray paint will hopefully fix both.


I'll let you know soon how the corner turns out!

Kathryn

Sunday, April 10, 2016

A SUNDAY THOUGHT...WHEN TRAGEDY STRIKES


NOTE: This post was originally written about a year ago after the death of a former student who died in a car accident. The truths in it still ring true today as we mourn yet another loss...

Last week I took a half day off from work--not to enjoy the sun, or eat lunch with a friend, or do some shopping, but to attend a funeral with my oldest son. It was the funeral of one of his college friends and one of my former students who happened to also be a neighbor. He was killed in a tragic accident.

It was an extremely hard day for his fellow classmates. At the funeral, the speakers shared stories of the joy their friend had brought to their lives, the encouragement he always spread, and the friendship he had shared with so many of them. How would they get through this difficult time? And how would his parents?

My thoughts made their way to his parents and family. How would his mother and father continue day in and day out with this void in their lives? How would I linger in this life if faced with such sadness? There wouldn't be any doing it alone, that I know. I would be leaning on others and, more importantly, on Him. This, one of my favorite hymns, is what filled and comforted my spirit in those days and in the days to come as the reality of death made itself known.

What a fellowship, what a joy divine,
Leaning on the everlasting arms;
What a blessedness, what a peace is mine,
Leaning on the everlasting arms.

Leaning, leaning,
Safe and secure from all alarms;
Leaning, leaning,
Leaning on the everlasting arms.

What have I to dread, what have I to fear,
Leaning on the everlasting arms?
I have blessed peace with my Lord so near,
Leaning on the everlasting arms. 

(Written in 1887 in Alabama by Anthony Showalter and Elisha Hoffman)

The eternal God is your refuge; and underneath are the everlasting arms...
Deuteronomy 33:27

I hope you have a great Sunday,
Kathryn

Wednesday, April 06, 2016

Lighting to create a lighter look...

One of the things I've been trying to do in our home for the past few years is "lighten up." 

Most of the furniture and furnishings we own were purchased in what my husband likes to call the "burnt brown era." We have dark furniture and many of the accessories we started out with were dark as well. Our house is older with dark cabinetry and darker shelving throughout. 

So, in this modern, neutral and white world of decor, what's a girl with two kids in college and number three starting in a few years to do to update her home? (Hint: I'm not rushing out to replace everything.) I'll tell you what she does. She starts small, slowly adding lighter colored accessories like pillows, pictures, and the one I'm talking about today--lamps. 

A pair of white or almost white lamps is a great way to change up or lighten up any room. It's also a good way to add a touch of modern that won't clash with your existing style.

Here are a few options that will blend with most decor.

Wayfair

Lamps Plus

One King's Lane

Safavieh - Amazon

This last one is the Mix and Match selection from Target. I found these right before Christmas and added them to our bedroom. (Yay for Christmas money!) You pick your lamp base and then add the shade that works for you. A great look, great quality, a great price, and a great starting point for creating a lighter, updated look to your home.

Target

The shade I chose had a linen look and feel to it.


It's the kind that sits right on the base.


If you don't have natural light streaming in from every angle of your house like in the magazines, the lighter look of white, cream, neutral, or even clear glass lamps will help your rooms seem brighter.

Here are a few other posts on lamps and lighting.


Do you like the look of white or cream lamps to create a brighter room? I love hearing from you!

Kathryn

Saturday, April 02, 2016

Poppy Seed Bread


I'm sharing a recipe today from my mom's collection. She made this poppy seed bread a good bit when we were growing up, but I never knew there was a glaze for it. We would just spread the slices with a dab of butter and warm it up in the toaster oven. When she sent me a copy of the recipe, I realized there was a glaze, and, I must admit, I got a little happy inside...

Ingredients:

3 eggs
2 cups of sugar
1 1/2  cups of oil
1 large can of evaporated milk
3 tablespoons of poppy seed (I used 2)
3 cups of self-rising flour
1 teaspoon of vanilla

Directions:

Preheat oven to 350 degrees. Grease and flour 2 loaf pans. Mix sugar and flour in a large bowl.


Add other ingredients and mix well.


Divide evenly in pans and bake for 50-60 minutes or until golden brown. As loaves are cooling, make the glaze. :-)


Glaze Ingredients:

3/4 cup of sugar
1/4 cup of orange juice
1/2 teaspoon of vanilla
1/2 teaspoon of butter flavoring

Directions:

Stir all ingredients over medium heat. Bring to a brief boil to dissolve the sugar. Pour over the cooled loaves.


Enjoy!

Kathryn